Product Description
Installation Steps:
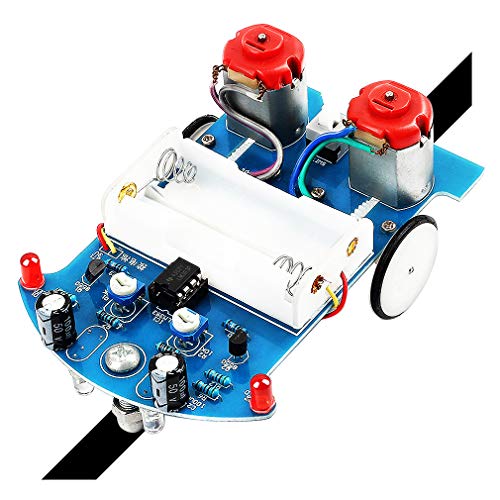
1. Install circuit
(1.1) Install metal film resistor, DIP-8P IC socket, Self-Locking switch, Potentiometer, S8550, Capacitor, Red LED on PCB according to mark on PCB;
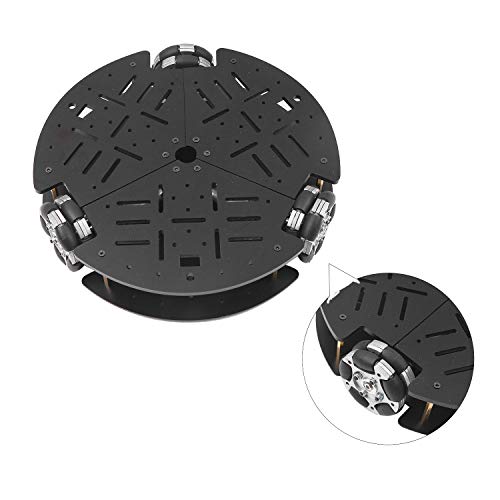
(1.2) Install Mecanum wheels. The support bolts of the caster are inserted into the hole, tighten the nuts screwed into the caster, and finally fit the caster and tighten;
(1.3) Install photoresistor and white LED on PCB reverse;
(1.4) Install battery case;
(1.5) Testing: Install your 2 pcs AA battery; Press on switch. If 2pcs white LED ON, the installation is successful. If LED off, please check the welding again.
2. Install mechanical parts
(2.1) Install the four gaskets on the circuit board;
(2.2) Insert a steel shaft from the center hole of the wheel and note that the direction is inserted from one side of the raised sleeve of the wheel. It is better to insert the steel shaft parallel to the smooth side of the wheel;
(2.3) Put a three-way sleeve into the steel shaft, close to the wheel, and then a gasket into the steel shaft, close to the three-way sleeve, installed in place, toggle three-way sleeve, should be flexible;
(2.4) Place a gear into the steel shaft in the center of the steel shaft;
(2.5) Put a three-axis sleeve into the end of the steel shaft so that the car side of the wheel assembly to complete;
(2.6) Install motors.
3. Testing:
(3.1) Power on. Check S8550 or 10ohm resistor if motors don’t move.
(3.2) Install LM393 (Please pay attention to the direction of IC).
Product Features
- Educational Toy Kit – A scholastic tracking robot building educational toy kit for students/kids to have intellectual development, hands-on ability, IQ building and interactive skills.
- Soldering Practice Kit – This robot car is widely used in school electronics learning project. Electronic-lovers and beginners can learn about basic knowledge of soldering simple circuits, photoelectric sensor, stepper motor, infrared sensor, C51 MCU and so on from this kit.
- Learn While Playing – Learn puzzle and physics circuit knowledge while playing. Student can design an interesting and winding route with a 1.5-2.0 cm black electrical tape on a flat ground to look at the robot car running. Perfect for parents playing with kids to have fun and meaningful family time.
- Principle – Smart tracking car is running based on the principle of the light reflectivity difference. The photoresistance on the board will detect the Red LED light that reflected by the ground to judge if it is following the black line.
- PDF Instruction – We provide PDF instruction at [Technical Specification] section on this page. Students/kids should do the assembly under the guidance of teachers/parents. All parts are provided in one package for kids/students to assembly DIY to have a sense of accomplishment.